Tesla Electrical Parade LightShow

Here is a fun light show I made for any Tesla using xLights.

LightShow.zip

  • Unarchive the file and then make sure the files are in a folder called “LightShow” (probably case sensitive) in the root of a USB drive.
  • Insert into your Tesla glovebox port.
  • Call up the Light Show function in the ToyBox.
  • When you initiate the light show, it should load from the drive. If it doesn’t work, then check for proper naming of folder and that it’s in the root. If still doesn’t work, try another USB drive.

Enjoy!

Moving Light Assistant – GrandMA2 Auto Patch and Stage Layout

Helpful steps in using MLA to automatically patch show and set XYZ values for fixtures based upon a fully populated Lightwright file.

GrandMA2 onPC

  • Create show with fixtures added and channel numbers correct per Lightwright. No need to patch. Script only uses channel numbers and not fixture numbers.
  • Enable Telnet in desk settings.
  • Start Session.
  • Do not have patch window open.

Lightwright

  • Delete any unpatched items from file.
  • Change address format to 1/100.
  • Run Export MLA in Automated Actions.

Moving Light Assistant

  • Import as ‘TEXT FILE’ and not Lightwright file
  • Tab Delimited, Ignore First, Lightwright format.
  • Change as below images show
Import settings in MLA
Also associate XYZ with VW Position
  • Import and delete any blanks.
  • Connect to console and login using built in GrandMA2 utility.
  • Run the script MA2 Patch Position Name Fixtures. Download here. Drop this file into the Moving Light Assistant / Scripts folder.

Changing SMPTE Timecode start on a Broadcast Wave file

There is a great reference available in Broadcast WAV files that allows many audio editing programs to display an embedded timecode stamp that was given to it from the audio program that created the file. I have found that when these files come from the audio team, they don’t necessarily have the correct start time entered (since no-one really needs to use it). However, it becomes very handy when you are programming offline and need to get markers in, in a program like Twisted Wave for example.

Go here and download Wave Agent (www.sounddevices.com).

Once installed, open Wave Agent. Drag the WAV file that you wish to alter into the large area at the top, or from the File menu, click on Import.

Wave AgentScreenSnapz001

At the Recording Info area in the center bottom of the display, click on Frame Rate and select the rate that your timecode audio file is running at.

Screen Shot 2014-09-15 at 5.12.26 PM

Make sure that Preserve Start TC is checked and then click on Edit. Change this time to match the time of where the timecode stripe on your audio file is starting at (if you’re not sure, ask the person who generated the audio file or run it through an actual SMPTE clock to find out – reference my earlier post on reading SMPTE on a mac to be able to do this).Screen Shot 2014-09-15 at 5.17.12 PM

My SMPTE stripe is actually starting at 08:00:00.00 however there is something weird in Twisted Wave that it displays the WAV file early by one frame, so I correct it here to make up for it.
Update: Twisted Wave version 1.13.2.4 or later has fixed this math error, so enter the actual start time; In this example it would be 08:00:00:00.

Click OK and then the SAVE button at the far left bottom most corner. Click OK to confirm and then after it’s done, you can close Wave Agent.

Open up Twisted Wave and then its Preferences. Under Time Display check Use time origin from audio file and then select the same frame rate that you encoded the file at in Wave Agent.

Screen Shot 2014-09-15 at 5.15.50 PM

Accept those settings and you should now see the start time you put into Wave Agent (minus one frame) in the cursor position readout at the top right of Twisted Wave

Screen Shot 2014-09-15 at 5.16.59 PM

What is nice about this setup, is that when you use Markers, the marker time will accurately reflect where that is in your timecode stripe. Very useful for cueing very tight segments for consoles without a learn function.

Routing and viewing SMPTE timecode internally from an audio file on a Mac (How to Use Qjackctl)

UPDATE: A newer compile of QJACKCTL (0.3.10) is available here.

I deal with SMPTE Timecode all the time; This is no secret.  I use a few programs to be able to see/verify the timecode on an audio track for programming.  This is specifically for a Mac; While one of the programs is available in all flavors (Mac, PC, Linux), the timecode reader is not.

I used to use a program called SoundFlower, which is seemigly a great and simple program, however it is abandoned software and completely unsupported.  The problem, I found out one night during programming, is that there is an immense amount of latency that can occur with some external audio devices in SoundFlower, and you may not even realize it until it’s too late.  I had to find something with no latency and was very reliable.

That’s when I found the internal audio routing program Jack OSX.  Head on over to this link and download the latest for your mac and install it:

http://www.jackosx.com/

After Jack is installed, and you have rebooted, open up JackPilot in the Applications/Jack folder.  Do not push Start in JackPilot.  Go to Preferences in JackPilot and Change the Input Channels to 8, and the Output Channels to 16.  Close JackPilot.  This is the last you’ll ever need to open it (but don’t delete it of course).

jackpilot01

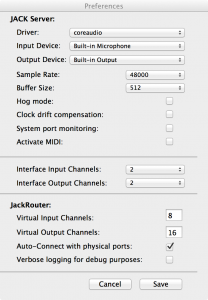
As of 0.9.0b8, they were including the very helpful program Qjackctl with the installation which is the GUI front end for Jack (gives you way more control than JackPilot).  They have typically been including Qjackctl v0.3.6 with the install. You can get a newer version here. Open up Qjackctl in the Applications/Jack folder.

jack01

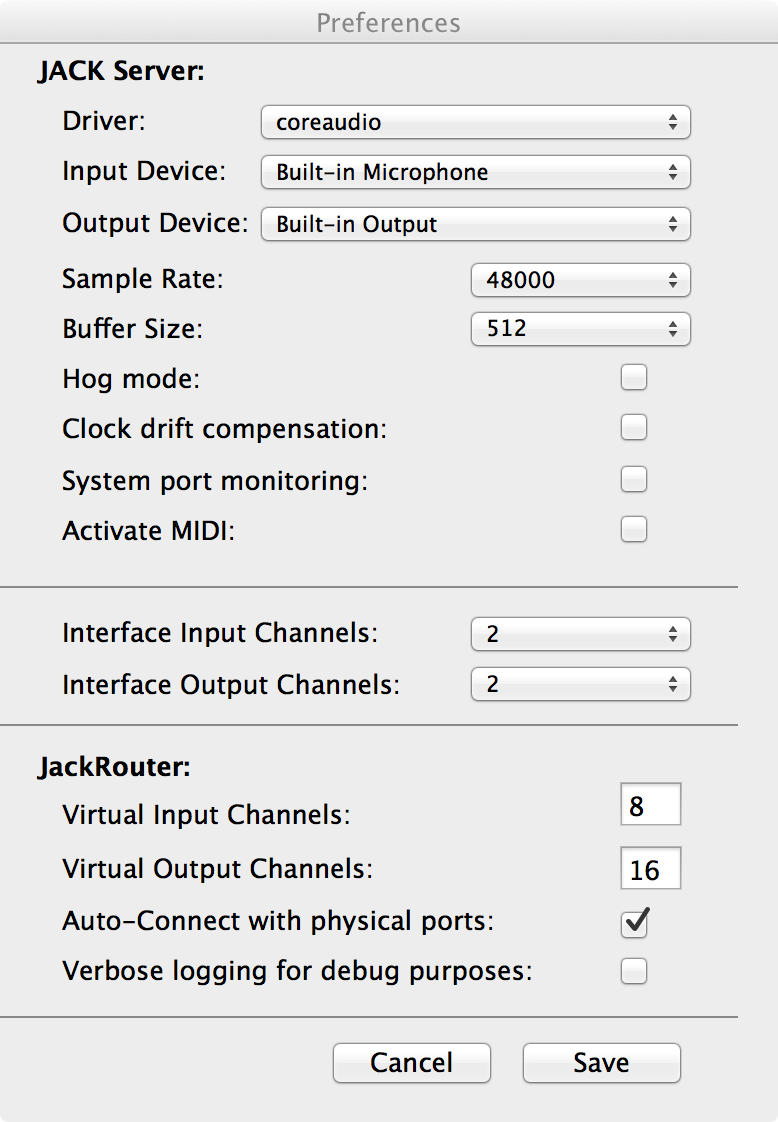
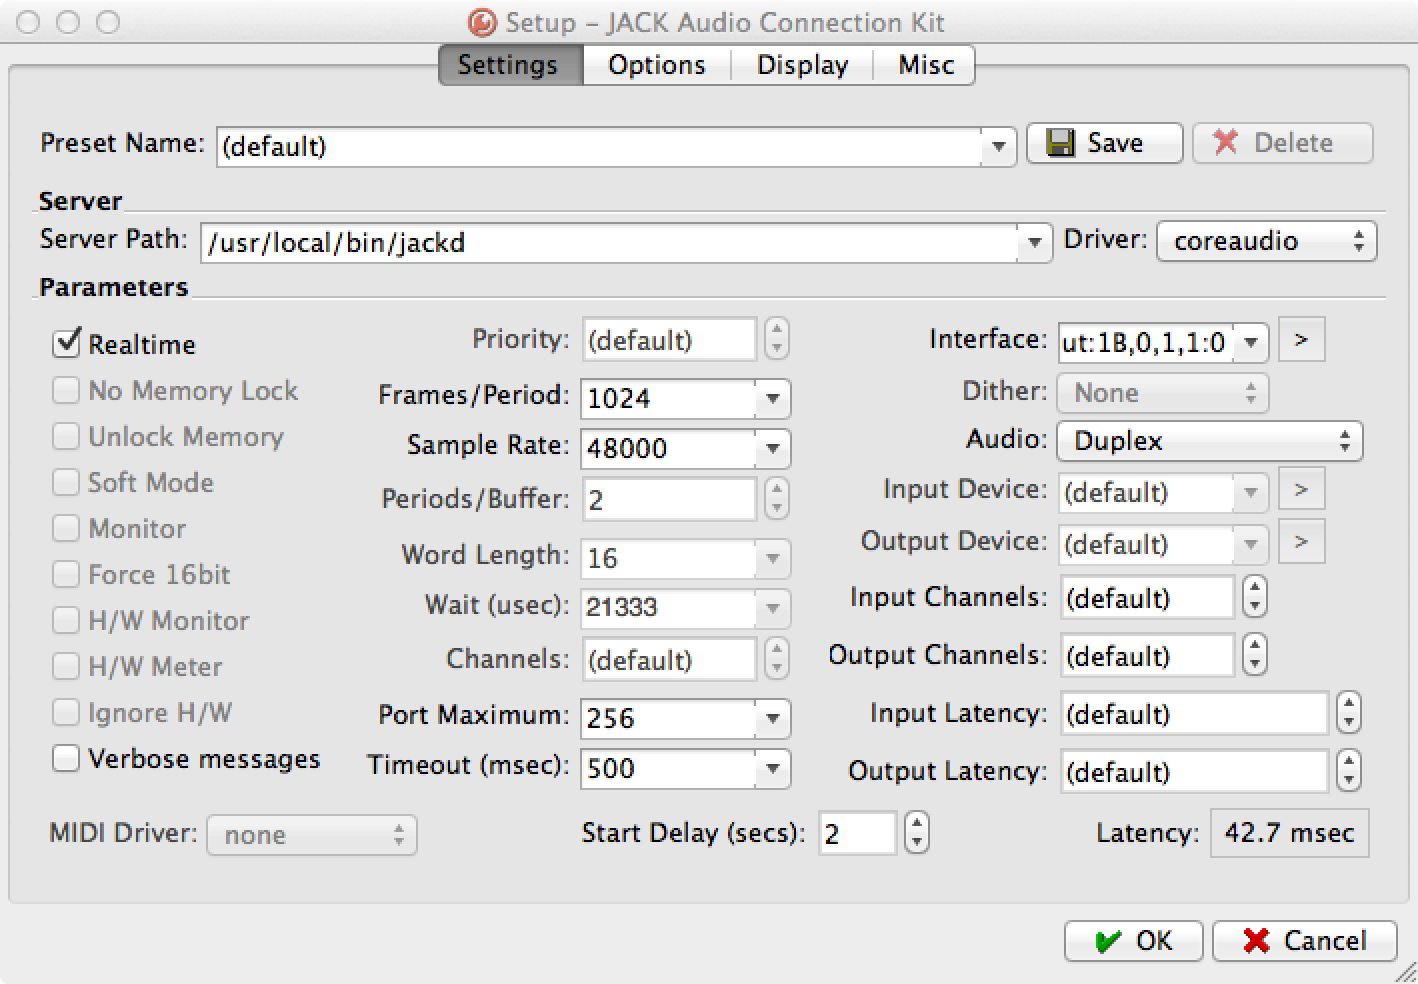
Push the Setup button at the right.  You’ll need to change a few entries to get it to work properly.  Change the Server Path to:

/usr/local/bin/jackd

Also change the Driver to “coreaudio”. This should be all that you need to adjust in this setup window.  Push OK.
Note: If you are using a USB/Firewire audio device, you would select it in the “Interface” area by pushing the right arrow button (not the drop down).

jack06

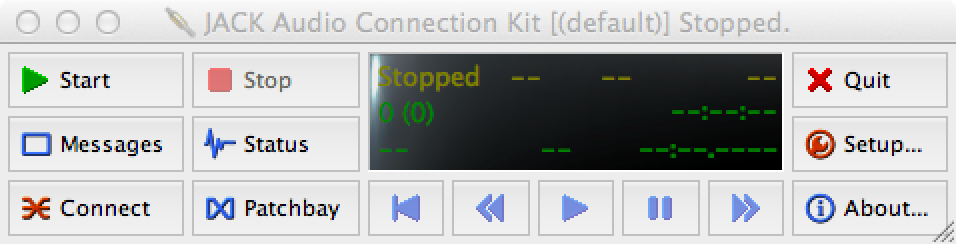
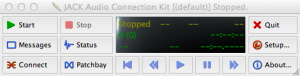
Back in the main window click Start. Hopefully the Jack Server should start up without any errors. If it does not, it is usually because the server path, driver, or interface was not entered correctly in Setup. If it starts successfully, you should see this in the center screen:

jack03

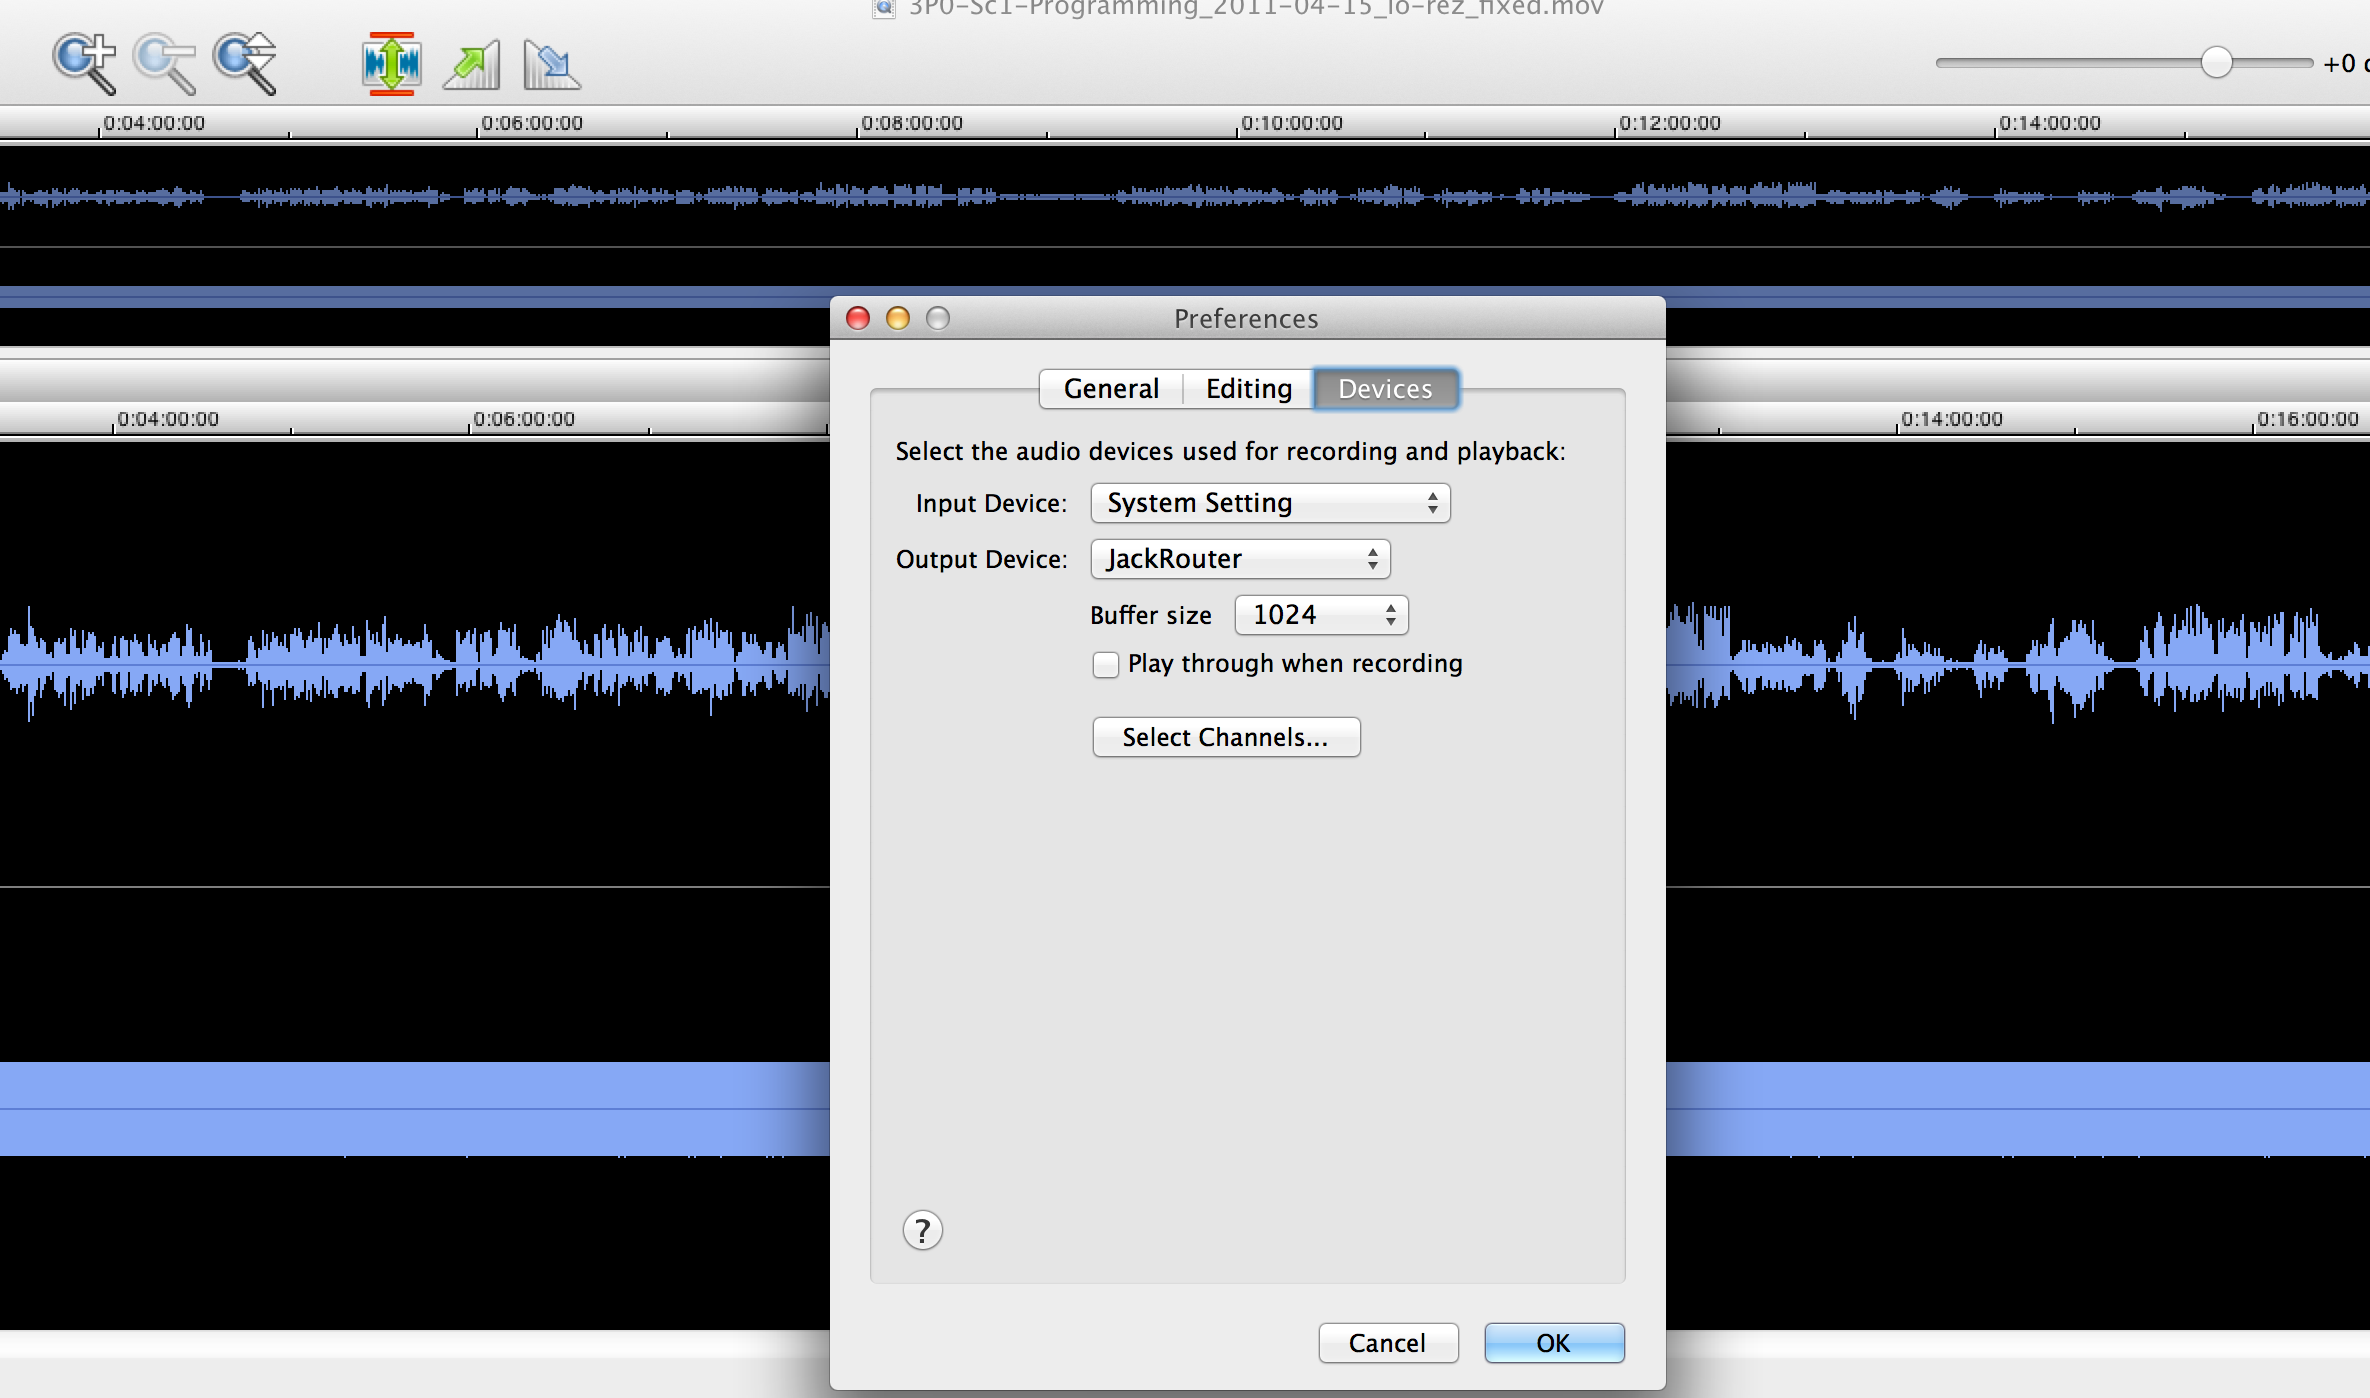
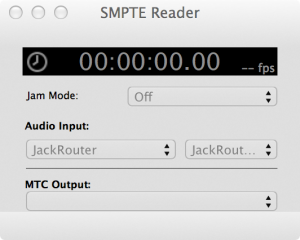
Now that Jack is running, we can now internally route audio around our system. To actually read the SMPTE, you can use the aptly titled SMPTE Reader from Sononum (Freeware!).  As for my audio playback, I’m going to use Twisted Wave. After installing Twisted Wave, open your audio file with it and head over to Preferences/Devices and change the Output Device to JackRouter.

twistedwave01

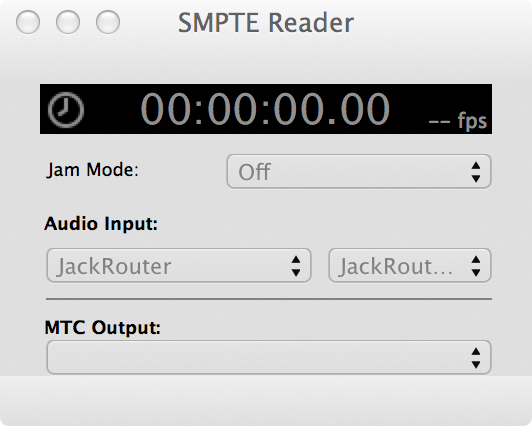
Now open up SMPTE Reader and change the Audio Input to JackRouter as well (I also recommend changing Jam Mode to OFF). You’ll notice that this little applet also has a cool feature where it will convert the LTC into MTC using any midi output your system might have (say built into a usb/firewire audio device or even a usb midi dongle). Super useful, but I digress.

smptereader01

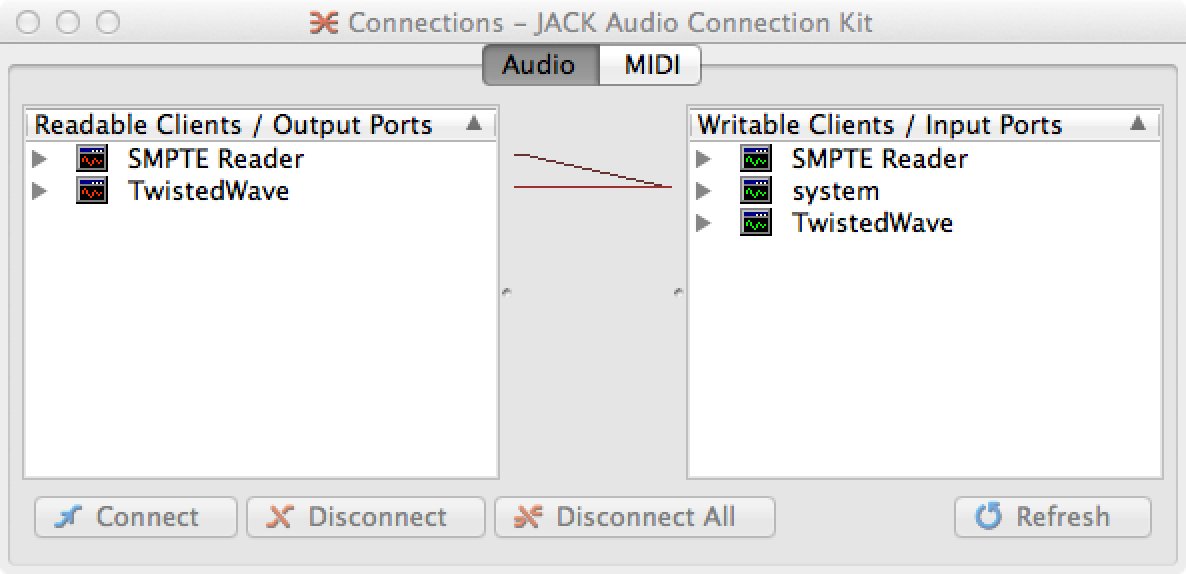
Go back to Qjackctl and click on the Connect button. QJackctl will try to be very helpful and will have already made some connections for you, they’ll be wrong. Push the Disconnect All button on this window and say Yes to the next popup.

jack04

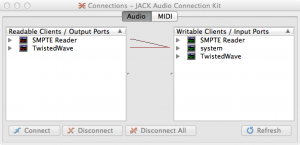
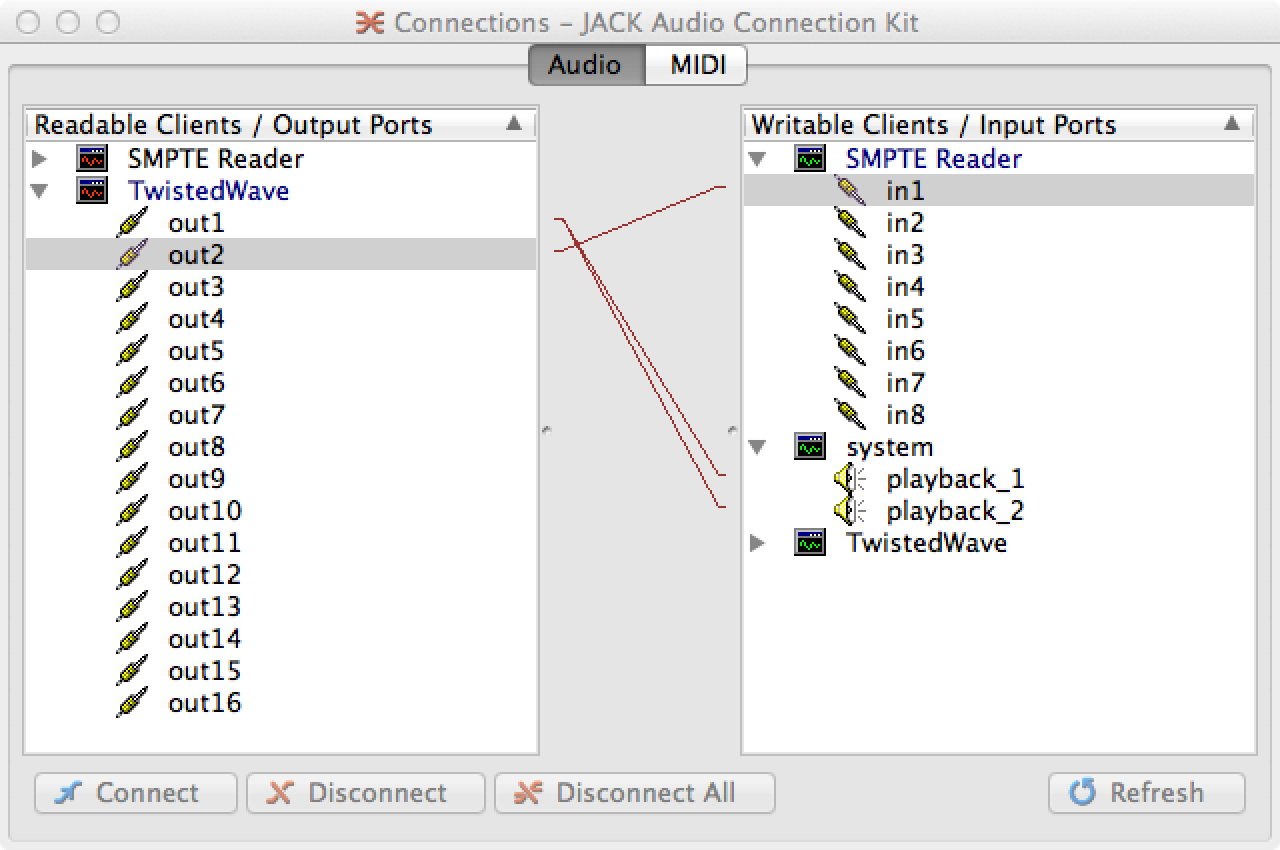
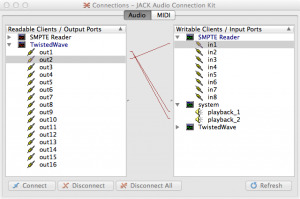
Expand the entries for TwistedWave on the left area and SMPTE Reader and System on the right area. This is where you will make your connections.  Assuming that your audio file has the program audio on the left channel and the SMPTE stripe on the right channel, you’d do the following; Under TwistedWave, click on out1 then under System, click on playback_1 (This equals the left channel of your Mac) and then click on Connect at the bottom.  A red line will draw between those two entries to make the connection. With out1 still selected on the left, click on playback_2 (Being the right channel of your Mac) and then Connect.  The reason for this is you can now take that single channel of program audio and push it to both of your speakers.  Next, click on out2 and under SMPTE Reader on the right, click on in1 then Connect.  It should look like this:

jack05

At this point you can close the Connections window.  Go ahead an push play in TwistedWave and you should get your program audio playing on both speakers and the SMPTE being routed to your SMPTE Reader.  If you are getting audio but the clock isn’t moving in SMPTE Reader, try closing and then reopening SMPTE Reader.  You may get a message when you close SMPTE Reader, but just click through it and close and reopen the program.  Push play again in TwistedWave and you should get the clock running now too.

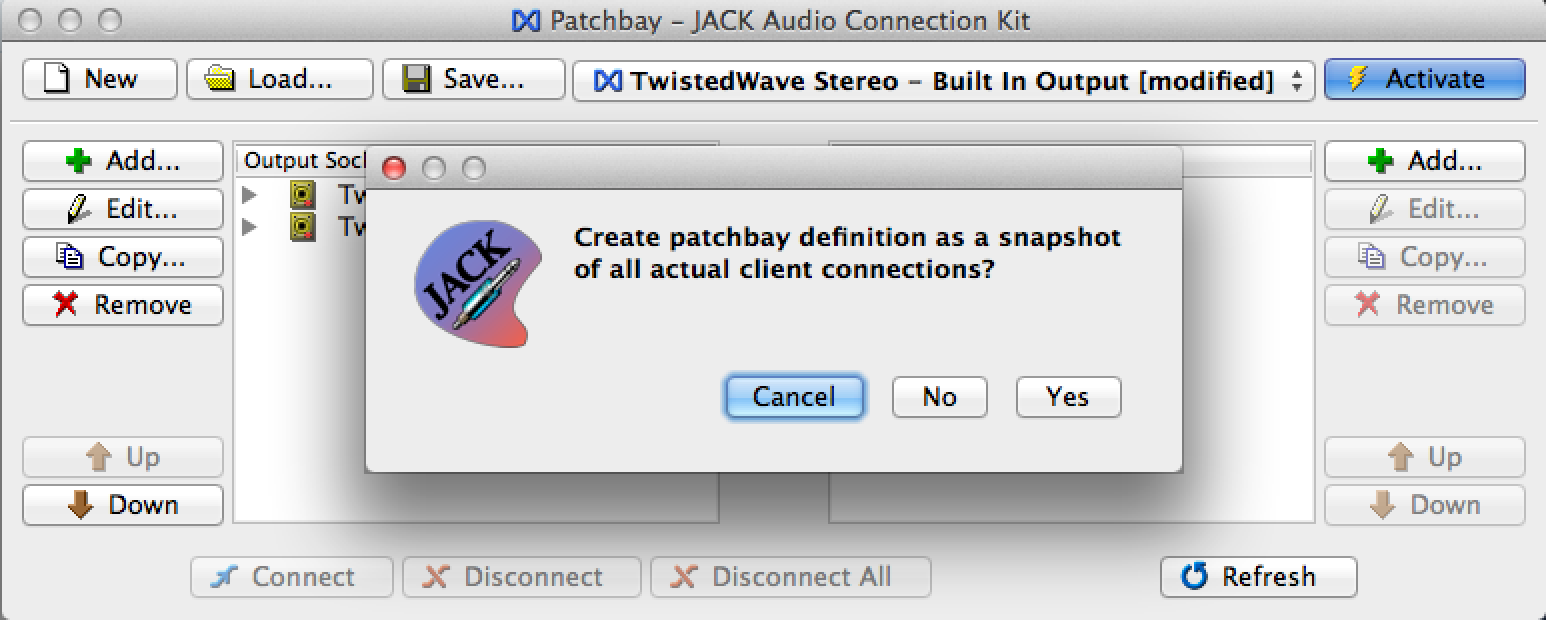
If you’d like to save your connections as a Profile that you can recall (you can do multiple of these so that you can have different routing setups), open up the Patchbay window in Qjackctl (button at the bottom center).  Select New from the top left and then select Yes regarding a snapshot for your current setup.  You can then save this and recall it for next time if your configuration gets messed up.

jack07

When you are all done with Qjackctl, close all of your programs that are linked to Qjackctl and then push the Stop button in Qjackctl, then Quit.

Sometimes when you start up all your programs above, the settings may have been forgotten and you’ll need to Disconnect All the connections in the Connect dialog again.  You can then go back into the Patchbay dialog and select and Activate your Preset that you saved.  It’s all a little wonky sometimes but it is very solid and reliable once it’s working.

Another great reason about operating Qjackctl is that you can also program to stereo audio in a multitrack audio program and route SMPTE to the reader as well, all without an external audio device.  I do this all the time in Final Cut Pro 7, where I have a stereo program track and then a separate stripe of SMPTE.  Life is too short for Mono! 😉

Jack OSX and Qjackctl is all open source and not officially supported by anyone.  There is though, a support group and some coders who take care and are still developing the software (it’s used by many pro audio editors).  You can find that group here at http://tech.groups.yahoo.com/group/jackosx/.

Good Luck!

-j

Philips Hue Control From AppleScript (For Use in iCal and Calendar)

UPDATE:I created this entry before an API came along that made all this easier. Some great documentation on how to do all of the below is listed here http://www.developers.meethue.com/documentation/getting-started

The Hue Series LED bulbs from Philips are very hackable and can be controlled via simple HTML Put commands. I have assembled a few things to get you started in some simple preset control via AppleScripts. I’m using this method to create an appointment in Calendar to automatically turn on and off these lights.

Before you start with all this, you should know/set the IP address of your base station. You can set the IP address of your bridge using the Hue app on iOS.  Go to the settings in the Hue app and then click on My Bridge/Network Settings. Turn off the DHCP switch and then set your IP below.  Click Save.

So now that you know your IP address, you’ll need to configure your bridge to accept commands. Go to this site (http://www.developers.meethue.com/documentation/getting-started) and follow the first page of steps up past where you create the user “newdeveloper”.

You’ll need to know which Hue Lamp you wish to control. The order that the lamps appear in the myhue website or the iphone app, is the same order that they are numbered. I’ve put markers into the scripts where you’ll paste and enter this info.

The first script you can use to see what your lamp is doing. This is useful to get the values of the color you have selected through the app that you can then paste those values into the other scripts to recreate the values that you set.  So first, using the app, set your lamp to the desired color and intensity.  After editing the script to include your IP address, API Key, and correct lamp; Run this first script to see the lamp values:

Get Bulb Status

set pollBulb to do shell script "curl http://10.0.1.111/api/newdeveloper/lights/REPLACEWITHLAMPNUMBER"

The important bits you’ll need from this are the Brightness (bri), Hue (hue), and Saturation (sat). Here are some sample values

{\"on\": true,\"bri\": 254,\"hue\": 12813,\"sat\": 219,\"xy\":[0.5196,0.4141],\"ct\":484}

To turn the lamp on at the value you found, you’ll change this next script to reflect what you found:

Lamp On

set turnOn to the quoted form of "{\"on\": true,\"bri\": 254,\"hue\": 15331,\"sat\": 121}"
do shell script "curl --request PUT --data " & turnOn & " http://10.0.1.111/api/newdeveloper/lights/REPLACEWITHLAMPNUMBER/state/"

Finally, here is a script to turn the lamp off:

Lamp Off

set turnOn to the quoted form of "{\"on\": false,\"bri\": 254,\"hue\":15331,\"sat\":121}"
do shell script "curl --request PUT --data " & turnOn & " http://10.0.1.111/api/newdeveloper/lights/REPLACEWITHLAMPNUMBER/state/"

So there ya go. Applescript yourself away.

Source for the above info from http://hackthehue.com/

-j

Mountain Lion Archive Bug

There is a bug in Mountain Lion (10.8.2) where you go to click on a compressed file to unzip it and your system just hangs and wont unzip it, forcing you to force quit the unarchiver.  Until they fix the bug, you can run this workflow to quickly kill the correct service. It will restart when you try to unarchive something again.  Drop this into your ~/Library/Services folder and then you should see it in the Services Menu under every application drop down on the menu bar. If you don’t see the service appear, open Services Preferences and scroll down to make sure there is a check mark next to the same of this workflow.

Compressor Fix Workflow

Q: But wait, how do I unzip this if the reason I came here was to get my unarchiver working again?
A: You can either reboot or type the following into Terminal:

sudo killall -KILL appleeventsd

The actual workflow is an applescript that does the following:

do shell script "sudo killall -KILL appleeventsd" with administrator privileges

Here’s the source:
https://discussions.apple.com/thread/4386915?start=15&tstart=0

-j

Setting up your Mac as a SysLog Server (for Pharos and Mosaic)

The past few years I have been using Pharos and Mosaic for all of my attraction programming (and some other random stuff too) and amidst debugging I heavily rely on the logs to see what triggers it’s getting and how things are playing in real time; Which is something the Web Interface in Pharos/Mosaic doesn’t show well in its update every 4 seconds or so.  There are quite a few good SysLog Servers you can install for Windows but for Mac you don’t need to because you have one built in, in the form of the Console application. It just requires a few settings to ‘unlock’ that functionality. Before you get started on all the below, I recommend you go install XCode (in the Mac App Store) right now. Later you’re going to need to edit a bunch of preference and conf files – XCode will ensure that things stay in check easily when you save them after editing.

I pulled this information from the following websites:

http://wiki.springsurprise.com/2010/01/30/enable-remote-logging-on-mac-os-x/
http://wiki.mikrotik.com/wiki/OS_X_Lion_as_a_syslog_server

Setup (using XCode)

Apple provides the Property List Editor utility as part of its developer tools (XCode).  The developer tools are usually a separate install from the operating system and is frequently not installed on systems.  If it is present, then using the Property List Editor may be the most convenient means of modifying the com.apple.syslogd.plist file.

  •     Login as administrator to the logging host
  •     Open the /System/Library/LaunchDaemons/com.apple.syslogd.plist file using XCode.
  •     Select the “Sockets” dictionary entry and “Add Item” to create a new key in the “Sockets” dictionary
  •     Change the name of the item to “NetworkListener” and set its type to “Dictionary”
  •     Select the “NetworkListener” dictionary entry and “Add Item” to create a new key in the “NetworkListener” dictionary
  •     Change the name of the item to “SockServiceName”, its type to “String” and its value to “syslog”
  •     Select the “NetworkListener” dictionary entry and “Add Item” to create another new key in the “NetworkListener” dictionary
  •     Change the name of the item to “SockType”, its type to “String”, and its value to “dgram”
  •     Save the file and quit XCode.  The property list should resemble the following example

Screen Shot 2013-02-03 at 4.30.52 PM

  • Open a terminal session using the Terminal utility
  • Navigate to the LaunchDaemons directory
    cd /System/Library/LaunchDaemons
  • Stop the currently running instance of the syslog daemon
    sudo launchctl unload /System/Library/LaunchDaemons/com.apple.syslogd.plist
  • Restart the syslog daemon to pick up the changes in the LaunchDaemon configuration
    sudo launchctl load /System/Library/LaunchDaemons/com.apple.syslogd.plist

OS X can use normal log files like any BSD, but it also comes with a built in data store for log messages. Data stores are fast, log rotation comes built in, and they are indexed and quickly searchable. I like my network syslog files routed to a different data store. Data store routing is configured in /etc/asl.log. Filtering can be done on a number of fields, the simplest one is “Host”, which will be the router name taken from “/system identity”. The “Sender” field is taken from the prefix configured under “/system logging” for the topic. I store my Pharos syslog messages in /var/log/pharos in data stores named by date in /var/log/pharos. The directory has to exist, the below creates it with read access for everyone on a directory level (everyone can list files):

sudo mkdir /var/log/pharos
sudo chown root:staff /var/log/pharos
sudo chmod 0755 /var/log/pharos
  • Find the file /etc/asl.conf and copy it to the desktop (maybe make two copies of it for when you mess up!). Open asl.conf in XCode and add the lines below to the end of the file to make the Pharos/Mosaic point its data to the above directory (lpc entries are relevant to Pharos, msc to Mosaic. You may omit the ones you don’t need):
    # dont post messages to all messages
    ? [= Sender lpc] ignore
    ? [= Message lpc] ignore
    ? [= Sender msc] ignore
    ? [= Message msc] ignore
    
    # save pharos log files
    ? [A= Message lpc] store_directory /var/log/pharos uid=0 gid=20 mode=0644
    ? [A= Sender lpc] store_directory /var/log/pharos uid=0 gid=20 mode=0644
    ? [A= Message msc] store_directory /var/log/pharos uid=0 gid=20 mode=0644
    ? [A= Sender msc] store_directory /var/log/pharos uid=0 gid=20 mode=0644
  • Using Terminal, move (sudo mv in unix speak) your new edited asl.conf file from the desktop to /etc/ and overwrite the file there. This process seems to screw up the permissions on the file so run ‘Repair Disk Permissions’ in the Disk Utility app to fix it.
  • Finally, restart the syslog daemon to have all the changes take effect:
    sudo launchctl unload /System/Library/LaunchDaemons/com.apple.syslogd.plist
    sudo launchctl load /System/Library/LaunchDaemons/com.apple.syslogd.plist
  • On the Pharos/Mosaic Network Tab, configure the syslog entry to point to the IP address of your mac and I also recommend changing the level to ‘Verbose’ (you can also change this in the Web Interface under the Configuration tab).

That should be it! Hopefully when you open the Console app and scroll down you should see your Pharos entry (obviously if you’re using Mosaic, just replace all references to that name in the above instructions). Here’s what mine looks like – I’ve blocked out the IP address next to the date (it’ll display the IP address of the controller sending you the info) but you get the idea.

Screen Shot 2013-02-03 at 4.53.12 PM

-j

Outlook for Mac Notification Center New Message Alert

Using MacPorts, there is a program called “Terminal Notifier” that can send alerts to Notification Center in Mountain Lion based off of a command line entry and thus an Applescript. Obviously, you can have a lot of fun with that – but I specifically found it so that I could send a new message alert from Outlook because Microsoft only has such a notification appear on the active desktop and I use several of them in Mission Control. I compiled this information from these sites:

http://osxdaily.com/2012/08/03/send-an-alert-to-notification-center-from-the-command-line-in-os-x/
https://github.com/alloy/terminal-notifier

https://github.com/goosetav/Microsoft-Outlook-Growl-Notifications/blob/master/Register%20Outlook%20with%20Growl.applescript

To get this to work isn’t so bad once you have MacPorts installed, which I’ve referenced earlier.

  • Assuming MacPorts is already installed, run the selfupdate command (also listed in that earlier post).
  • Install Terminal Notifier:
    sudo port install terminal-notifier
  • Download and put this AppleScript into your Documents/Microsoft User Data/Outlook Script Menu Items (you don’t have to put it there, but just for organizational sake, might as well). Sure it says Growl in everything below as that is what I originally used it for but then changed it to accommodate Notification Center instead:Improved Growl New Mail.scpt
  • In Outlook, create a new rule that will run the script based on your criteria. Here’s mine:
    blog_outlookrulesnotificationcenter

That’s all there is to it.

-j

MacPorts Installation and Sending UDP Messages from the Command Line and Applescript

UPDATE: A very easy tool to send UDP commands can be found here http://packetsender.com/

Spurred on by one of my colleagues, I found a way to be able to send UDP messages from the command line without a lot of fuss. Granted, you do have to install some things on the backend, and any applescript you make wont be able to run on any computer unless this same process has been completed, but it’s still useful if you need to send UDP messages (say to a Pharos/Mosaic/Eos). This was all done in Mountain Lion 10.8.2:

  • Follow the instructions here up to the point where it gets you to install the game – don’t do that. They refer to Darwin Ports everywhere – it’s actually called MacPorts now.
    http://www.nzmac.com/features/how-to/installing-unix-software-on-a-mac/continues.html
  • You can find the install for MacPorts here:
    http://www.macports.org/install.php
  • When in the instructions on the nzmac.com site, it tells you to change to the darwin ports directory, this is the command instead:
    cd /opt/local/var/macports
  • Anytime you see “dports” substitute “macports”.
  • After you’ve gotten through all the above, you’ll want to install the program “socat” which will allow you to send the UDP messages:
    sudo port install socat
  • Once that has installed sucessfully, you should now be able to send UDP messages now like the following. You would replace “HELLO” with the text you wish to send and then change the IP and port number to the device you’re sending to:
    echo "HELLO" | socat – UDP-DATAGRAM:192.168.0.255:5000,broadcast

Now for the actual Applescript, that part is easy, you just have to insert a “do shell script” command into an applescript where you can ask for variables, etc.  Here’s an example:

set UDPstring to the quoted form of "Hello_Does_This_Work"

do shell script "echo " & UDPstring & " | opt/local/bin/socat - UDP-DATAGRAM:192.168.0.255:5000,broadcast"

MacPorts has some other fun things you can install, like Terminal Notifier for instance. Here are some commands to remember:

  • To make sure that your installation is up to date and to upgrade anything you may have installed through MacPorts, run these two commands:
    sudo port -v selfupdate
    port upgrade outdated
  • To search for a particular program or to list all the programs (replace {name} with your search criteria:
    port search {name}
    port list
  • Finally again, to install a new port, the command is:
    sudo port install {portname}

As usual, YMMV and always backup your computer before you do something you’re unsure of.  Good Luck!

-j

Welcome to the New Website!

After deleting my entire new website once (that’s what I get for not backing up the mySQL database!) – I’ve gotten good at building the whole thing from scratch. It started from me wanting to post things that I’ve figured out how to do so others maybe don’t have to scour the InterGoogle as hard. That plus the fact that I haven’t updated my site since 2005, thought it may be a good idea to step into the now.

Anyhoo, here it is.